
To purchase an ad-free printable PDF of this pattern, click here.
Materials: Stitch marker, buttons, needle and thread, yarn needle, 1/8” ribbon (optional)
Yarn:
Bunny looks best in “Red Heart Buttercup” (with “Bernat Pipsqueak” inside ears)
Chicks were made in “Bernat Pipsqueak”
You will also need a small amount of #4 worsted weight yarn for the beak/nose
You will also need a small amount of #4 worsted weight yarn for the beak/nose
Note: Not all stores carry the full range of colors for Bernat Pipsqueak (I got mine from Joann’s, they had the extra colors as a special order) so listed below are some yarn substitutes. If you can’t find any of the yarns listed, try any fuzzy yarn that is a #5 bulky weight. You may have to experiment with gauge.
- “Yarn Bee Cameo Soft Bulky” (from Hobby Lobby)
- “Bernat Boa”
- “Red Heart Baby Clouds” (needs a larger hook size and pattern adjustments)
- One strand “Fun Fur” or “Eyelash” yarn held together with one strand #4 ww yarn (you will probably need more than one skein of fun fur)
Size Chart:
0-3 Months: 12-14” circumference, approximately 5.5” from crown to brim
3-6 Months: 14-16” circumference, approximately 5.5 to 6” from crown to brim
6-12 Months: 16-18” circumference, approximately 6.5 to 7” from crown to brim
Toddler/Child: 18-20” circumference, approximately 7.5 to 8” from crown to brim
Teen/Adult: 20-22” circumference, approximately 8 to 8.5” from crown to brim
Hook Sizes: “K” (6.5 mm) for hat (“L” 8 mm for Baby Clouds) and “G” (4 mm) for beak/nose
Note: If you are using “Baby Clouds” yarn, you will need to go up a hook size, and eliminate one rnd of increases, so basically you are following one size smaller in the pattern. For size 0-3 months, stop with Rnd 3 and continue with the next section. Make sure total height of hat matches actual correct size.
Abbreviations Used:
st or sts - stitch or stitches
ch - chain stitch
sc - single crochet
sc2tog - single crochet two stitches together
hdc - half double crochet
sl st - slip stitch
rnd(s) - round(s)
ww - worsted weight
Special Stitches Definition:
Magic Ring: You can find directions for the “magic ring” here: http://www.youtube.com/watch?v=FHYVutk2iYY. You do not have to use this method; alternate directions are also given.
Tips for working with the Pipsqueak or Buttercup yarn: When you are working the increasing rounds in the beginning, try to work with no distractions so you can concentrate on counting stitches as you go. It is VERY difficult to go back and count your stitches later. Once you get past the increasing rounds it gets easier, but you will still have to “feel” for each stitch. If you are off by one stitch though, don’t worry, it’s not going to be visible with this yarn. If you are not comfortable working with these yarns, “Yarn Bee Pitter Patter” is an acceptable substitute and works up with the same gauge, but will give a different finished result (you will be able to see the stitches, it is not as fuzzy).
Pipsqueak Hat: (All Sizes)
All varieties (except Baby Clouds yarn) - Use “K” (6.5 mm) hook
(For Baby Clouds yarn, see tip in beginning of pattern)
Note: The top of this hat is worked in continuous rounds to avoid an unsightly seam. Add a stitch marker around the loop on the hook after completing the first round for reference. Move as you complete each round. Complete round for size you are making and skip to Rnd 9.
Rnd 1: Magic ring, ch 2, work 8 hdc in ring, join with sl st in first hdc. (8 hdc)
OR ch 2, work 8 hdc in 2nd ch from hook, join with sl st in first hdc. (8 hdc)
Rnd 2: 2 hdc in ea st to end of rnd. (16 hdc)
Rnd 3: (1 hdc in next st, 2 hdc in next st) to end of rnd. (24 hdc)
Rnd 4: (1 hdc in next 2 sts, 2 hdc in next st) to end of rnd. (32 hdc)
Stop here for 0-3 mos, skip to Rnd 9.
Stop here for 0-3 mos, skip to Rnd 9.
Rnd 5: (1 hdc in next 3 sts, 2 hdc in next st) to end of rnd. (40 hdc)
Stop here for 3-6 mos, skip to Rnd 9.
Stop here for 3-6 mos, skip to Rnd 9.
Rnd 6: (1 hdc in next 4 sts, 2 hdc in next st) to end of rnd. (48 hdc)
Stop here for 6-12 mos, skip to Rnd 9.
Stop here for 6-12 mos, skip to Rnd 9.
Rnd 7: (1 hdc in next 5 sts, 2 hdc in next st) to end of rnd. (56 hdc)
Stop here for toddler/child, skip to Rnd 9.
Stop here for toddler/child, skip to Rnd 9.
Rnd 8: (1 hdc in next 6 sts, 2 hdc in next st) to end of rnd. (64 hdc)
Teen/adult, continue with Rnd 9.
Teen/adult, continue with Rnd 9.
Rnd 9: hdc in ea st to end of rnd.
Repeat Rnd 9 until you reach the approximate measurement below:
0-3 Months: Continue until hat measures about 5” from crown to brim.
3-6 Months: Continue until hat measures about 5 to 5.5” from crown to brim.
6-12 Months: Continue until hat measures about 6” from crown to brim.
Toddler/Child: Continue until hat measures about 7.5” from crown to brim.
Teen/Adult: Continue until hat measures about 8” from crown to brim.
Last Rnd: sc in last st and then sl st in first hdc of rnd. Place stitch marker around loop on hook, ch 1, sc in each st to end of rnd, join with sl st (or invisible join) in first sc. Fasten off. Weave in ends.
SMALL Beak/Nose Option:
Use “G” (4 mm) hook and #4 worsted weight yarn (crochet tightly)
Use “G” (4 mm) hook and #4 worsted weight yarn (crochet tightly)
Row 1: ch 5, sc in 2nd st and each st across. (4)
Row 2: ch 1, turn, sc in each st across. (4)
Row 3: ch 1, turn, sc2tog twice. (2)
Row 4: ch 1, turn, sc2tog. (1)
Edging: ch 1, sc evenly all around edge. (sc, ch 1, sc) in next two corners, 3 sc in last corner, join with sl st in first sc. Fasten off (leave 10” tail to sew on hat).
LARGE Beak/Nose Option:
Use “G” (4 mm) hook and #4 worsted weight yarn (crochet tightly)
Use “G” (4 mm) hook and #4 worsted weight yarn (crochet tightly)
Row 1: ch 7, sc in 2nd st and each st (6)
Row 2: ch 1, turn, sc2tog, sc in next 2 sts, sc2tog. (4)
Row 3: ch 1, turn, sc in each st across. (4)
Row 4: ch 1. turn, sc2tog twice. (2)
Row 5: ch 1 turn, sc2tog. (1)
Edging: ch 1, sc evenly all around edge. (sc, ch 1, sc) in next two corners, 3 sc in last corner, join with sl st in first sc. Fasten off (leave 12” tail to sew on hat).
Feathers on Top of Chick’s Head Option:
Using same yarn as hat, take 4 or 5 strands (8” long) and working from the inside of the hat, thread the ends through on either side of the top middle stitch. Tie a knot and trim ends to desired length (keeping them a little uneven looks more natural).
Using same yarn as hat, take 4 or 5 strands (8” long) and working from the inside of the hat, thread the ends through on either side of the top middle stitch. Tie a knot and trim ends to desired length (keeping them a little uneven looks more natural).
Note: This method doesn’t work very well with the fun fur option, so try this alternative as suggested by one of my pattern testers: With a “G” (4 mm) hook, make different lengths with chain stitch, tie them together and sew on hat.
Bunny Ears Option:
Use “K” (6.5 mm) hook and (Buttercup in white) for outside of ears, (Pipsqueak in pink) for insides.
Use “K” (6.5 mm) hook and (Buttercup in white) for outside of ears, (Pipsqueak in pink) for insides.
Note: You can use Pipsqueak for the entire bunny hat but the ears will be much floppier. Even if using Baby Clouds yarn, use “K” hook, as the ears will stand up a little better. One option might be to try crocheting over pipe cleaners to help the ears hold their shape.
Step 1: With pink yarn, ch 13, sc in 2nd st and next st, hdc in each st to end. Fasten off. (12)
Note: Don’t worry if you are off by a stitch, it won’t make much of a difference. Just count the stitches as best as you can.
Step 2: With white yarn, ch 13, sc in 2nd st and next st, hdc in each st to end. Do not fasten off. (12)
Note: For the next rnd, place the pink piece on top of the white one and work through both pieces of the ear.
Edging: ch 1, sc evenly around entire edges making your stitches through both pieces. At bottom corners (sc, ch 1, sc), at top edge of ear, work 2 sc in top stitch. Fasten off (leave 8” tail to sew on to hat).
Assembly of Pipsqueak Hat:
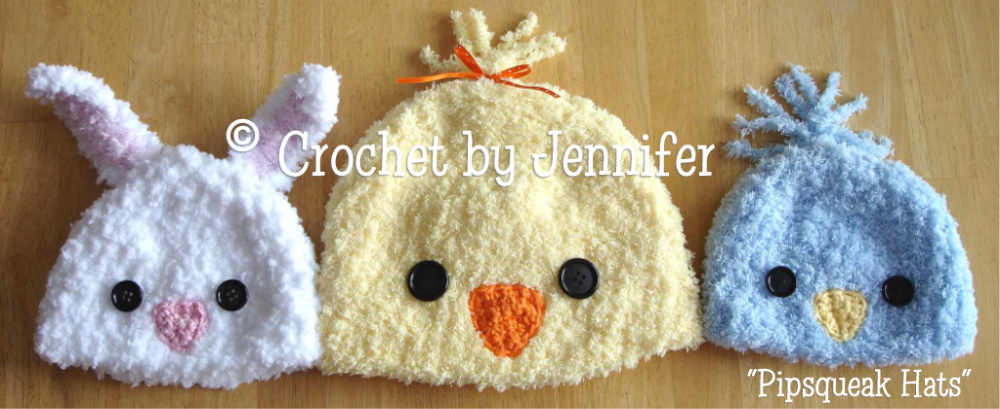
Weave in all loose ends. Add “feathers” (see above) for chick hat. Sew beak/nose on hat using yarn needle, then sew on (button) eyes, (and ears, if making a bunny hat). Use photo as guide for placement.
Note: If you use buttons for eyes, be sure to warn your customers or hat recipients that baby should always be supervised while wearing hat.
Copyright Notice:
You are absolutely welcome to sell your finished items from this pattern in any manner you choose. However, do not copy, share, or redistribute the pattern itself in any way. Please provide a link to my website if you sell your finished items online. (If you change the name when you sell your item, please mention the pattern name in the link so other people can find the pattern.)
You can link like this:
Pipsqueak Hat Pattern by Crochet by Jennifer
Disclaimer: Any purchases from advertisements will help support this content at no extra cost to you.
No comments:
Post a Comment